The Process
Archaeological objects recovered from marine environments contain large amounts of chlorides and soluble salts as a result of long-term exposure to seawater. These compounds pose significant risk of corrosion. In order to prevent corrosion and other types of damage to artefacts recovered from the sea, salts must be removed through treatment and desalination.
As a preparatory measure, all objects are cleaned from dirt and calcareous deposits. Hard and course sediments are removed mechanically or by special tools, while soft sediments can be treated by brush. Enzymes are used when treating organic compounds and the pH values of the items and other indicators are measured to ensure that conservation does not pose additional harm. For cargo pieces where there is significant risk of damage, soluble synthetic resins may be applied to minimize loss of paint, detail or other decorative surfaces.
Subsequent to surface cleaning, non-metal objects, such as ceramics, stone, glass and wood, are desalinized by soaking them in baths of water purified by reverse-osmosis. Throughout this process, scientists measure and test salinity levels of the treatment baths to prevent growth of micro-organisms and ensure that additional stress is not exerted on artefacts. Over time, the salts leave the objects and move out into the desalination baths, leaving the artefacts as free of salts as possible. When complete, the artefacts are places on drying racks and inspected.
For metals, such as bronze, silver and gold, corrosive materials must be removed mechanically by scalpel, sandblasting or micro-grinding, or alternatively through chemical treatment. These objects are also desalinated, although through an electrochemical process that is optimized for medal surfaces. Subsequently, the artefacts are treated to prevent further environmental damage, often with chemical treatments.
The following article by Andreas Rettel describes in detail the conservation methods.
Andreas Rettel
The Concept of the Conservation of Seawater Finds
The concept of the conservation and
restoration of a vast amount of found objects is a great task for private and
state-run institutions. It would be better for various excavation finds in the
world to remain hidden, because then they would not be exposed to new and
variable environmental conditions, which are the cause of the continuing
deterioration of the objects. This is particularly true for seawater finds.
Against this background and
because of the sense of responsibility for the salvaged cultural assets of the
interesting cargo from the
This chapter explains the
framework of the measures. In some cases that can be regarded as representative
for groups of wares, I will go into the treatment of individual objects in more
detail. The amount of different objects does not permit a detailed listing of
their particular conservation needs.
I. Conservation and Restoration of Ceramics
a. Conservation
Seawater finds present a
particular difficulty regarding conservation: Depending on their material,
composition and the period they have been on the seabed, these objects have
deposits and have been penetrated by substances typical of the medium seawater
or have formed chemical compounds and are corroded.
Ceramic seawater finds have
become saturated with salts without them entering into a chemical reaction with
the components of the ceramics. They can, therefore, be removed in pure water.
These salts are ineffective as long as the objects are on the seabed or stored
in ideal storage conditions. If the objects dry out untreated or if they are
exposed to changing storage conditions, the salts that have penetrated them are
activated to move in the course of time. They accumulate beneath the denser
outer layers where they can crystallize. During this process, pressure develops
that can cause the denser outer layers and glazes, respectively, to exfoliate
or be damaged.
To avoid this, a concept of
conservation has been developed that ensures the controlled desalination of the
ceramics.
The kind and number of
ceramics from the
For ceramics of the same
manufacture – form, glaze, thickness of the material, kiln – the
same water and salt absorption can be presupposed. The desalination process,
therefore, is the same for these ceramics, which made it possible to construct
large basins correspondingly. The basins were arranged in rows accessible from
the side to fill and empty them as well as to control the desalination progress
by measuring the results on the bottom in different places (fig. 3).
Preparatory measures
Most objects were cleaned
from adhering dirt and calcareous deposits before they were put in the
desalination process (fig. 1). This ensures a smooth running of the facilities
and possible peculiarities of the objects are recognized earlier, the speed of
the process is increased and the measurement of the desalination is simplified.
Very hard and coarse
sediments are removed mechanically with the help of micro grinding devices or,
if possible, with dental tools, e.g. scalpel. The cleaning of softer sediments
is done under running water with the help of a scalpel or a soft brush. If
there is deep organic soiling, enzymes are used.
If applying one of the
mechanical methods mentioned above would mean a risk of damaging the original
surface, the object is cleaned with appropriate chemicals. It depends on the
object which strength and type of chemical is applied, long exposure times
should generally be avoided.
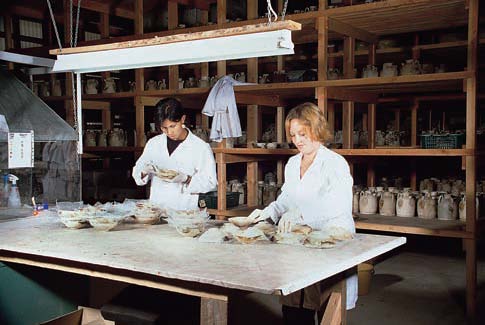
Fig. 1 Check of condition of the ceramics
(Photograph: A. Rettel).
Repeatedly, compresses that
have been soaked in chemicals are put on the ceramics that have been thoroughly
wetted with water before that treatment until the deposits are removed. After
this treatment, the ceramics are extensively soaked in water and are checked by
means of pH value.
The glazes that were used
in the cargo are more or less prone to flake off the ceramics. Soluble
synthetic resins (glue dissolved in alcohol or in acetone) are applied to the
parts at risk to stabilize the sensitive glazes on the ceramics. This is done
in an individually adjustable extensive fume extraction system constructed
especially for that purpose. The mixing ratio is chosen in such a way that the
resin penetrates the fine cracks of the glaze and consolidates it from behind
by gluing it together without harming the appearance of the glaze. Excess of
the synthetic resin on the surface is dissolved in solvents and removed. The
choice of the consolidant depends on the state of
preservation or on the stability of the objects.
The individual ceramic
objects that have been cleaned, consolidated and graded according to their
kilns and types are put into basins (fig. 3) without point of contact with one
another as far as possible. Depending on their forms, special attention is
given to the optimum way for them to be washed round, and to stability. When
the water of the basins is changed, it is important to avoid ‘air
chambers’ in order to achieve the maximum salt extraction and to keep the
objects placed in a stable way.
Desalination
The medium water used for
desalination was examined for harmful substances and classified as completely
harmless. When the desalination of the ceramics is started, the necessity can
arise to add salt to the water since stress exerted on the sherd
can lead to reactions, too. This was tested in the preliminary stages of the
desalination measures and considered not necessary.
The basins are covered with
black foil to protect their contents from soiling and incident light –
development of microorganisms. The basin system that was created according to
these requirements has the advantage that it is possible to statistically
control the groups of wares during their desalination process, which is
documented through regular measurements (fig. 2).
As water always endeavours
to distribute soluble substances as evenly as possible, the deposited salt is
extracted from the ceramics. At the beginning of the desalination process, this
is more evident because at unglazed spots, an easy transportation of salt in
solution is ensured.
Due to the density of the
glaze, the extraction is hindered at glazed spots, which is documented by lower
results but still continuous salt emission in the process of water changes and
readings.
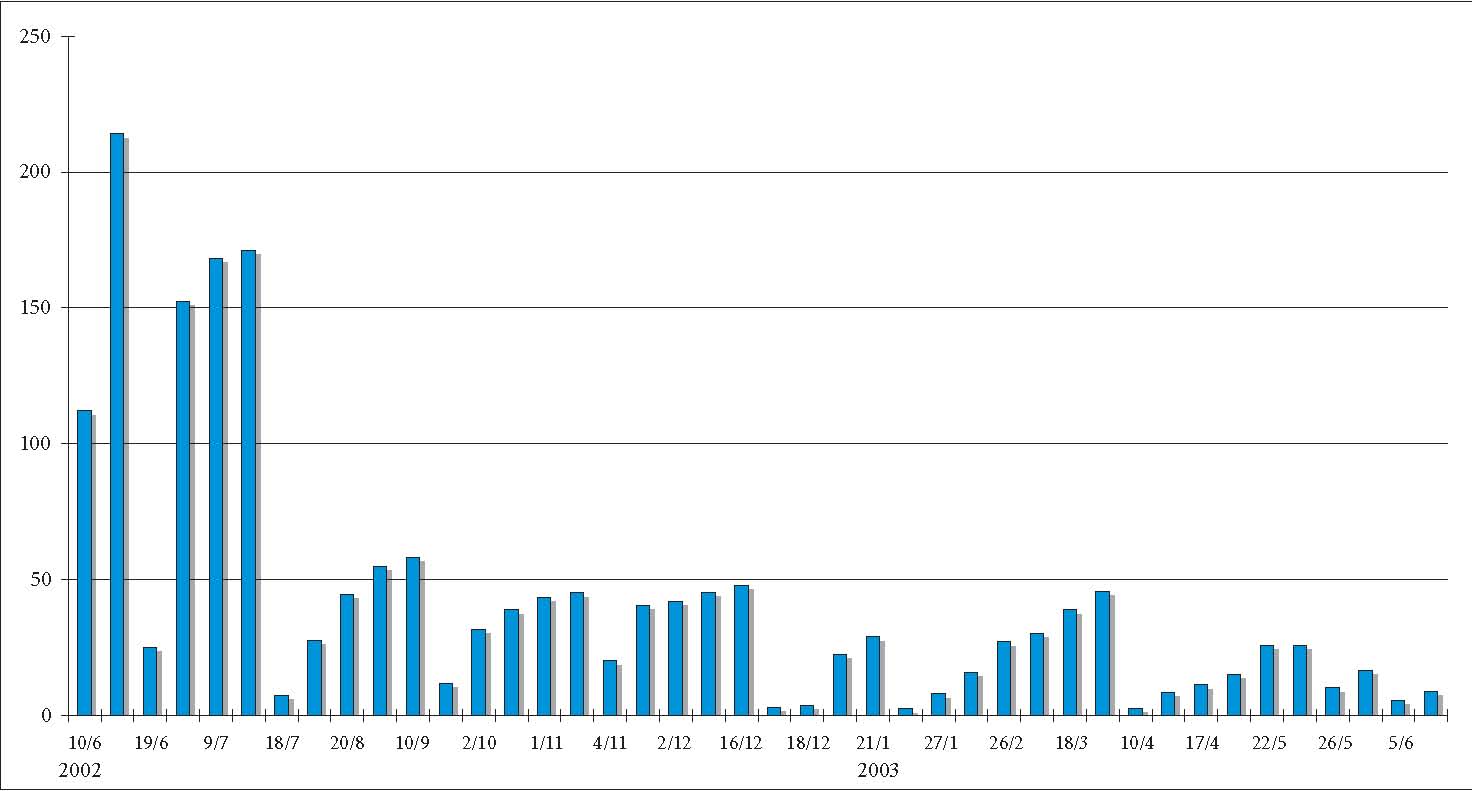
Fig. 2 Example of a desalination graph.
The dissolved solid
substances in the water are measured by means of a conductivity meter, which
shows an increasing flow of current between anode and cathode (microsiemens). This measurement method by means of
conductivity meter can be applied to objects that have been cleaned from
concretions; with objects that have not been cleaned and treated, the chloride
content has to be determined directly since other minerals like calcium ions also dissolve into
the water. Due to the different forms of wares, different amounts of water are
available for the desalination of the individual object, which has to be
considered regarding the results of the measurement. The water changes are
carried out according to the documented results; it is always the same amount
of water that is used in the basins. As soon as one basin reaches the stage of
a slower rise in results, the water is pumped through a cycle comprising a
de-ionisation system (20 l/min) and a UV-light filter (fig. 3).
We use a reversible
synthetic substance for deionisation and special UV-light waves to destroy the
microorganisms that develop despite the covering foil, without having to fall
back upon chemicals which could be harmful to the objects. This process is
repeated at certain intervals until the results stagnate again. To substantiate
the statistical value, some objects from different basins are put into
individual basins with deionized water – if the
results do not change here, the desalination is regarded as completed. The
subsequent drying takes place on shelves, slowly and under plastic foil if
necessary. Then, all the ceramics are checked again regarding the state of their
glazes and they are consolidated again or any excess consolidant
is removed if need be.
Archiving
The objects that have been
combined in groups are now individually photographed and entered encoded into
the data collection. The code includes the following information: kiln, form,
desalination graph and numbering. The conserved state of the object is recorded
in this way and it forms the starting point for a condition and treatment
report in which also all of the fol lowing treatments
and the photo of condition are entered to ensure the best transparency possible
for all of the following measures (fig. 4). Comparative studies on the part of
the archaeologists, classification according to distinguishing characteristics
as well as all restoration measures can now be entered individually.
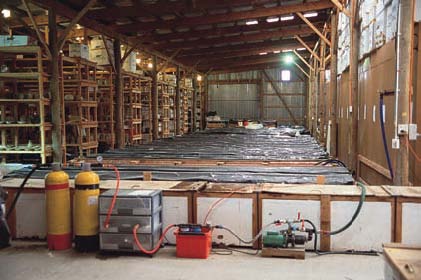
Fig. 3 Part of the basin unit (Photograph:
A. Rettel).

Fig. 4 Entry of data (Photograph: A.
Rettel).
b. Restoration
The restoration of archaeological objects is a sensitive topic; it
includes subjective points of view. When the visible texture in the broken sherd has been analysed scientifically, one person might
like to leave it in this state, another one, however, might think that an
object which has been reconstructed according to special requirements with the sherd of the original fitted in at the right spot, is the
right step towards understanding the ancient cultures better in their technical
capabilities and skilfulness, in their forms and coloration. Aims of
restoration are conservation and restoration of the original state of the
object as far as possible and justifiable. It is possible within certain limits
to restore changes or damages that have been caused to the object whose original condition can be proved
through comparable objects (cf. figs 5a–d).
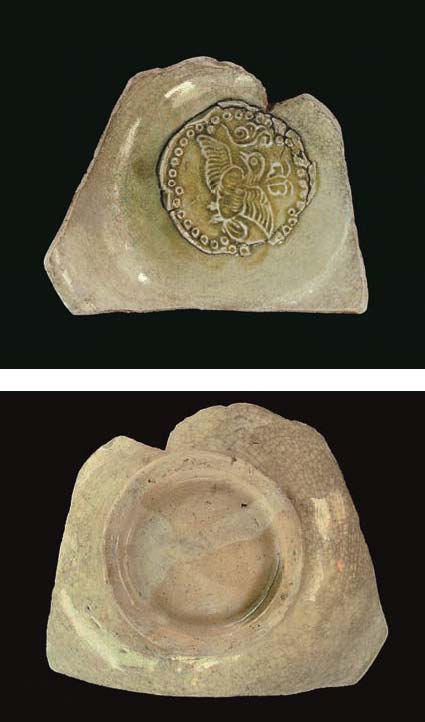
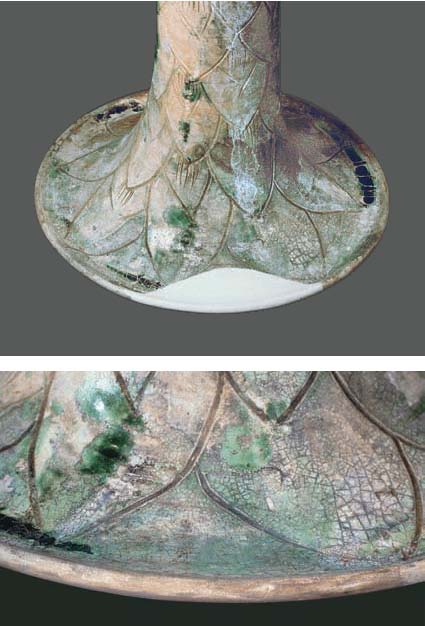
Fig. 5a, b Sherds of
the bowl no. 62, top (above) and bottom (below) view
(Photographs: A. Rettel).
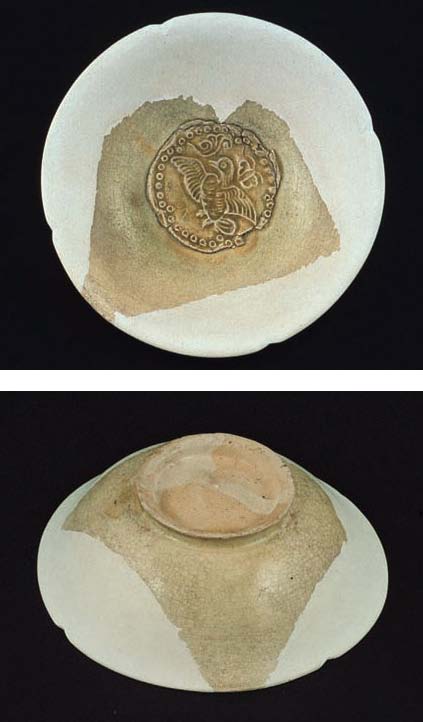
Fig. 5c, d Plaster replacement of no. 62
defined through original form and comparable objects; top (above) and
bottom (below) view (Photographs: A. Rettel).
Changes to
the object as, for example, corroded glaze always remain in their respective
state. The cleaning of sticking oxides, removal of cracks, replacement of
missing parts and retouching them are done for static and aesthetic reasons.
Fills are retouched if the missing part is small. Bigger replaced parts remain
unpainted. The intervention in the original colour design of the manufacturer
seems too great in these cases. The priority is here not to change the
character of an antique object, i.e. objects are not supposed to look new but
to show their antique traces. Damaged parts are restored according to the
character of the object so that their repair becomes a harmonious part of the
object. Missing glaze on the ceramics is not filled. All materials used for
restoration are selected according to their greatest possible reversibility.
The restoration measures are documented in writing and photographs in the
condition and treatment report of the object so that all the different steps of
the process remain comprehensible.
Each one of
the objects that are to be restored is discussed beforehand with the
conservators concerning requirements and possibilities. Documentation is a very
important factor here. Only documented restoration work allows doubt-free
scientific research and allows the public to see the artistic skill of the
ancient manufacturer.
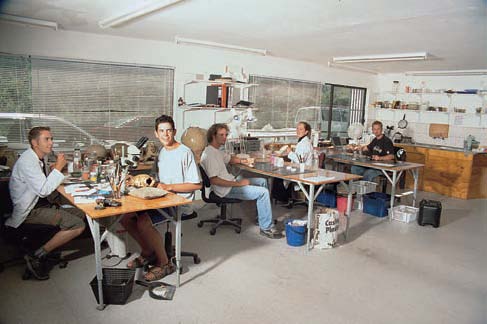
Fig. 6 Ceramic
restoration laboratory (Photograph: A. Rettel).
General description of the completed restoration
measures
Broken pieces that belong
together are glued together with reversible glue in such a way that edges
cannot be felt. Chipped off pieces are filled – with plaster or an
air-drying modelling clay depending on the size of the missing part – and
then retouched. If mechanical impact has caused cracks in the ceramics, stress
that came into existence through the manufacturing process is released, which
causes the fracture edges to distort. These cracks are drawn together and glued
if the stress inherent in the ceramics makes this possible.
Missing pieces whose
original form is defined through comparable objects are filled with plaster
that is tailored to the exact form of the object. For this purpose, a template
is made of the original. The ceramic object is soaked well before the missing
part is replaced so that it does not draw water from the plaster fill. The
material plaster is used because it does not cause damage to the original. The
transition to the original surface can be aligned well without damaging it.
When the plaster is brought into its form, plaster dust develops that could
stick to the fine pores and cracks of the glaze or to the unglazed spots. To
avoid this, the adjacent surfaces are treated with a reversible protective film
(Revultex, B72) that seals the surface. After
completion, it is removed again. Fine dirt or plaster traces that exist on the
surface in spite of the precautions are removed by applying a latex solution,
which is followed by wiping it off during the curing process.
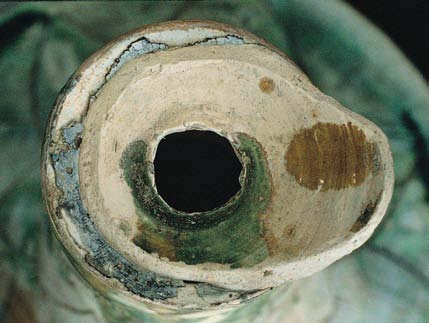
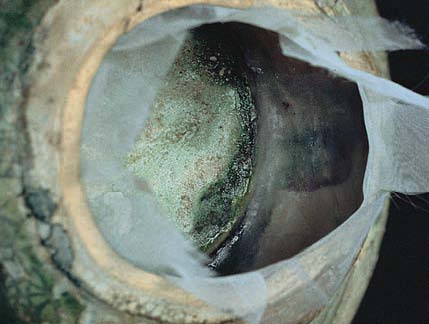
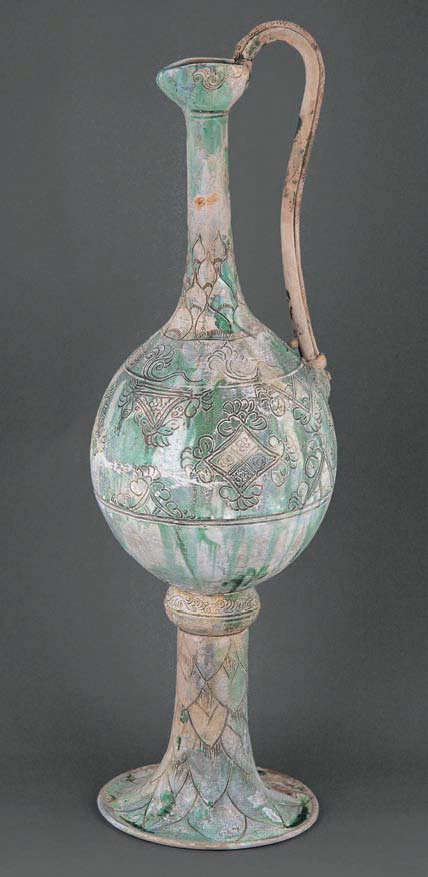
Fig. 7a Hu ewer
no. 75: Top view of fracture at trumpet-shaped foot towards the middle ring;
remnants of the middle ring, glued onto the foot by glaze firing (Photograph:
A. Rettel).
Fig. 7b Hu ewer
no. 75: Top view of the fracture edge of the middle ring around vessel body,
originally very thin wall, with respect to weight and size of the object,
stabilized on the inside with synthetic gauze (Photograph: A. Rettel).
Figs 7c, d Fragments
of the middle ring of hu ewer no. 75 (Photographs: A.
Rettel).
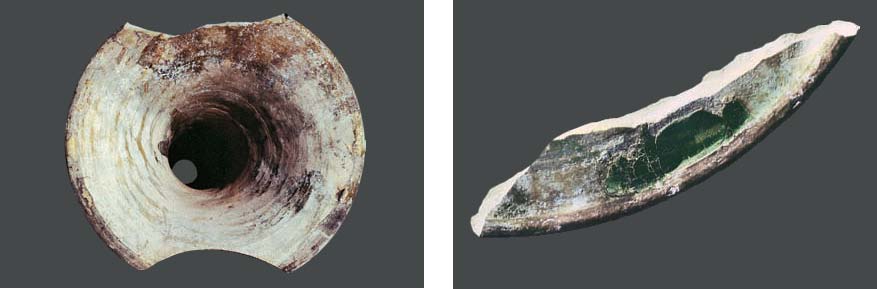
Fig. 7e Hu ewer
no. 75: Bottom view of foot, one sherd broken off,
one piece missing (Photograph: A. Rettel).
Fig. 7f Original
sherd of hu ewer no. 75
(Photograph: A. Rettel).
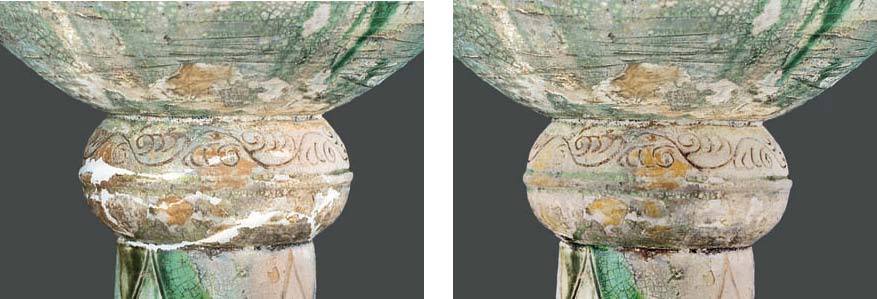
Fig. 7g Hu ewer no. 75: Fragments of the middle ring put together
with foot and vessel body, stabilized from the inside, missing pieces and
chipped off pieces filled with plaster and an air drying paste (Photograph: A.
Rettel).
Fig. 7h
Retouched fills of hu ewer no. 75 (cf. fig. 7g) (Photograph:
A. Rettel).
Missing handles, loops,
feet and the like are copied from an identical part of the same object or other
comparable objects by means of moulding material, they
are fitted in the exact place, filled with plaster and touched up. Gaps and small
chipped off pieces are filled with an air-drying paste.
Parts like these are
retouched with oil colours (according to their glazed surface and colour) and
if they have a glossy original glaze, they are polished. The last step is to
apply a very small amount of protective acid-free museum wax with a piece of
lint free cloth – and slightly polish it. Every single object is finally
checked and the stability of its condition, i.e. the colour of the filled
parts, is controlled for a while. Every fill that has been made is documented
and comprehensible as well as reversible at any time (cf. figs 7a–k).
Figs 7i, j Missing
piece at foot of hu ewer no. 75 filled with plaster
(above); retouched fill (below) (Photographs: A. Rettel)
Fig. 7k Hu ewer
no. 75, desalinated, glaze stabilized, restored (10.43 l. volume) (Photograph
courtesy Seabed Explorations).
II. Conservation and Restoration of Metal Objects
As with land excavations,
corrosion of antique metals found on the seabed depends on environmental
influences: for example aerobic or anaerobic area, buried deep down in the
sand, rocky surf, composition of gas mixture of the water, vicinity of other
metals, salts deposited in the corroded parts, as well as the reaction of the
respective metals to the respective factor, might all play a part in the
various forms of corrosion. When corroded metals are salvaged, they have to be
kept moist and be put into nitrogen to keep away oxygen and any further
corrosion that is connected with it.
a. Bronze
The bronze objects from the
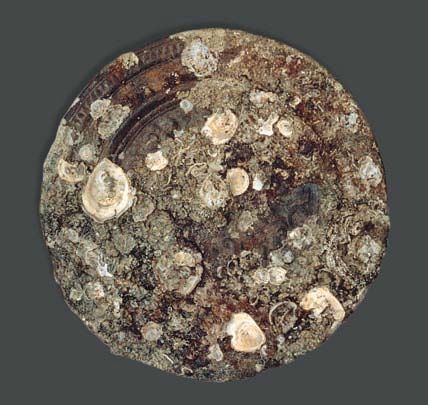
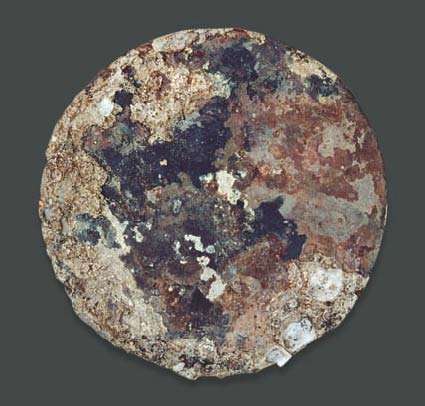
Fig. 8a, b Mirror no. 24: Condition at time of
discovery; décor side (top) and mirror side (bottom)
(Photographs: A. Rettel).
Various mirrors with
different designs have been salvaged (see pp. 194–223). Chinese mirrors
were cast in a so-called mirror-bronze which is very close to silver in colour
and which is polished to brilliance on the mirror side. Due to the long period
of time the objects had been on the seabed, different types of corrosion had to
be removed from the surface under the sediments. Dif ferent
states of conservation required different procedures. On well-conserved, stable
surfaces, the corrosion could be removed carefully from the original surface
with a trihedron scraper or scalpel and micro fine
grinder, respectively. The colour of the metallic surface which reappeared had
changed to blackish in the course of time as the objects had been lying in the
seawater, next to lead, for a long period (cf. figs 8a–c).
Especially in the case of
badly-conserved surfaces below corrosion and sediments, it is better to get a
clear idea of the surface that has to be cleaned in order to be able to take
better care with depictions and details of the work and to recognize the degree
of the different impacts of corrosion and conditions there. This is done by
taking an X-ray, whose kV strength and duration of radiation are regulated
depending on the thickness of the material and its condition. At the light box,
one can recognize the composition of the picture of light and dark parts in
gradually changing shades. The lighter ones are those that could not or less
well be penetrated by the X-rays; the dark ones are the thinner or corroded
parts (cf. fig. 10 and below p. 137, fig. 1; p. 139, fig. 4; p. 141, fig. 7).
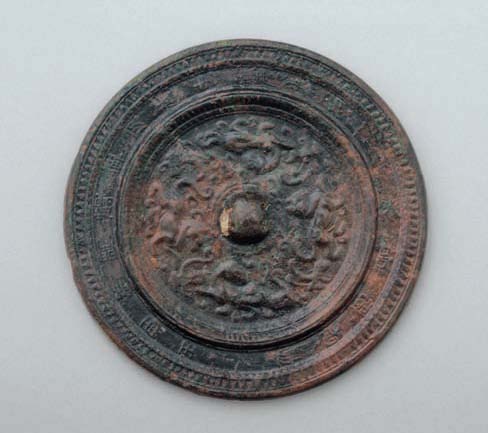
Fig. 8c Mirror no. 24: Décor side,
after completion of conservation and restoration measures (Photograph courtesy
of Seabed Explorations).
Restoration of bronze – one example
In the case of the mirror
no. 22, the exact depiction of the inscription was required although the
surface was in a very bad condition (figs 9a, b). Using the information
provided by the X-ray (fig. 10), the characters and depictions could be cleaned
mechanically under the microscope – deposits were removed by means of
scalpel, micro grinding devices or micro sandblaster (using soft material).
During this process, the corroded, unstable and damaged surface was
consolidated reversibly whenever it was necessary. The mirror halves were
soaked in distilled water and controlled.
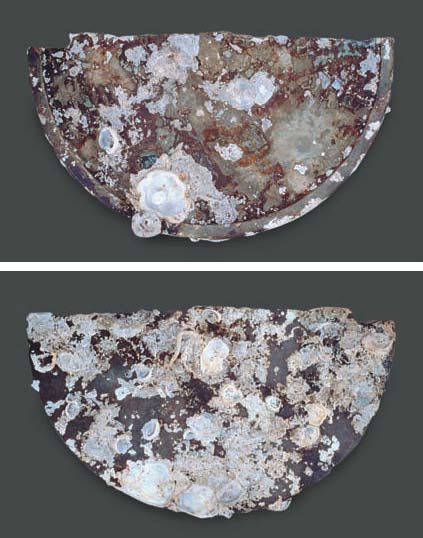
Fig. 9a, b Condition of one half of the mirror
no. 22 at time of discovery; décor side (above) and mirror side (below)
(Photographs: A. Rettel).
After cleaning the surface
and the fracture edges (figs 9c, d), we desalinated in accordance with the
electrochemical (e m f ) series of metals. Remaining
salts in the bronze are activated to corrode to aluminium foil through contact.
Other bronze objects with a more stable surface were desalinated in accordance
with the Thouvenin method. After the desalination,
the object is rinsed well in distilled water and dried under an infrared lamp.
To stabilize the surface, a treatment with benzotriazole
was carried out.
Corrosion points in the
fracture edges of both mirror fragments are found out and removed under the
microscope with the help of occlusion
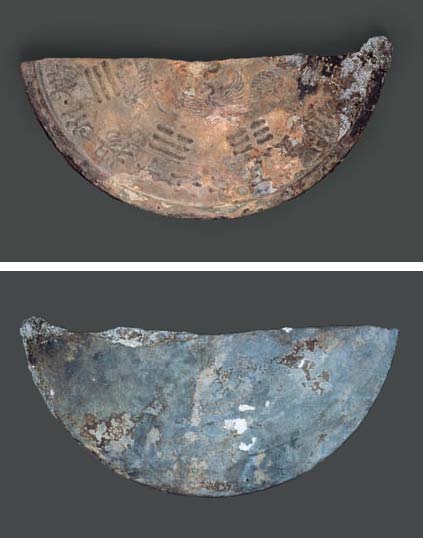
Fig. 9c, d Intermediate photograph after
removal of deposits and corrosion from the surface of one half of the mirror
no. 22 using the X-ray; décor side (above) and mirror side (below)
(Photographs: A. Rettel).
paper to allow the fragments to be put
together again with optimum precision. Both halves are put together in their
original alignment and they are fixed firmly. As an adhesive, a special twocomponent epoxy resin is applied with the help of dental
instruments in such a way that it can spread between the fracture
edges without excess. This does not yet produce a smooth transition to the
original surface after it has hardened. The smooth transition is produced by
applying identical synthetic material, thickened with talcum powder and tinted
in the various shades of the original surface and after it has hardened, it is
worked to an even surface level. The missing piece is also filled smoothly with
tinted synthetic material. The cleaned surface was matt due to corrosion and
was treated with calcium carbonate. A thin application of paraloid
B72 to which some BTA is admixed, as well as the final application of a special
wax coating, constitute the termination of the process
(fig. 9e).
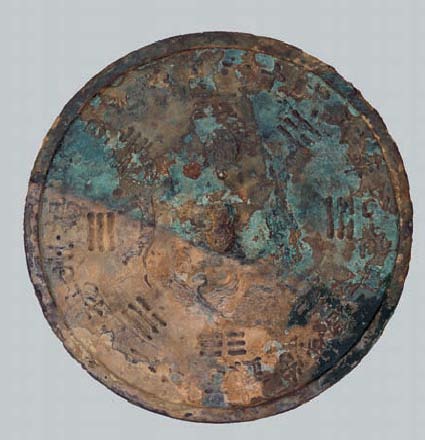
Fig. 9e Joined mirror halves (no. 22) after completion of conservation and
restoration measures (Photograph courtesy Seabed Explorations).
The steps of the procedure
are documented by photograph of condition, X-ray, intermediate and final
photographs as well as treatment entries in the condition and treatment report.
The filling measures can also be identified as such at any time by means of
X-ray pictures.
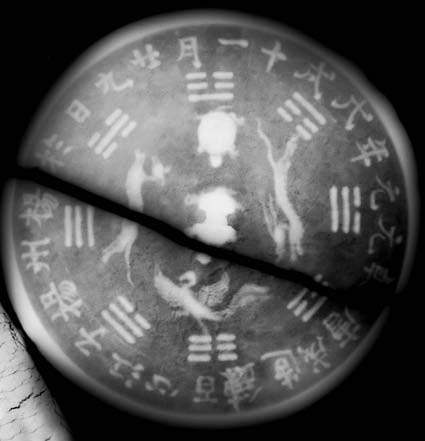
Fig.
10 X-ray of the
mirror no. 22 (Photograph courtesy Seabed Explorations).
b. Silver
The silver objects of the cargo
were in various states of conservation: all were covered by black corrosion
layers and sediment deposits. There were complete objects and objects broken
into pieces or corroded objects with missing pieces (figs 11a, b). The
different states of conservation can be explained by the fact that
- they were in seawater for a
long time
- some objects were stored safely
inside other objects and, in this way, protected
- the metallic conserved silver
changed its structure through intercrystalline
corrosion and is susceptible to breaking when deformed or stretched
- direct vicinity and influence of
other metals, in our case lead and iron.
The corrosion layer of the
silver ingots could – in parts - be removed well mechanically from the
surface (fig. 11c, d).
Small ingots were in such
an advanced state of corrosion that one side could be cut open with a dental
diamond cutting tool and removed with an instrument and then, the silver piece
could be taken out. Apart from the silver ingots, all the silver wares are partially
gilded and decorated.
Bottom and lid of all of
the boxes were firmly corroded together. The calcareous deposits were removed
mechanically with a scalpel or chemically from the soaked boxes and the boxes
were rinsed well repeatedly.
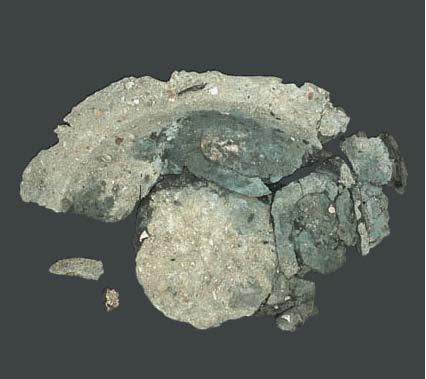
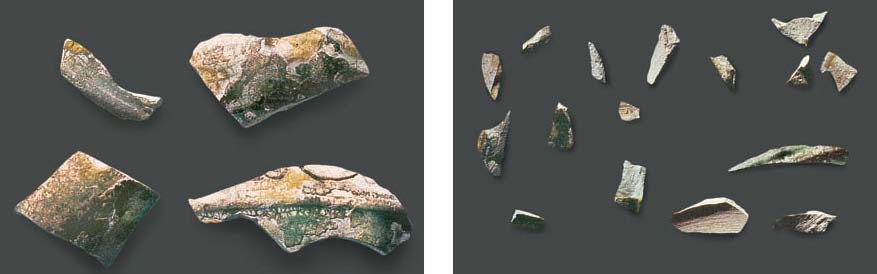
Fig. 11a Example of the fragments of a
partially gilded silver plate; photo of condition (Photograph: A. Rettel).
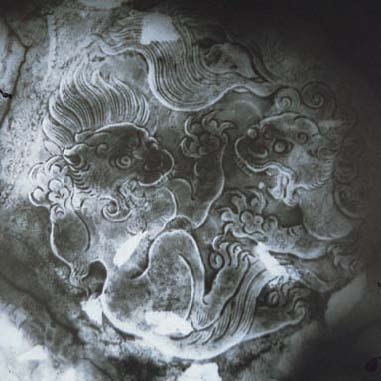
Fig. 11b Example of the fragments of a
partially gilded silver plate; X-ray of central area (Photograph courtesy of
Seabed Explorations)
Diluted hypochloric
acid (5–10%) was used, and the objects were rinsed well afterwards. The
corrosion layers came into existence through the respective circumstances of
storage and influences and, in its corrosion process, the silver diffused
through the gilding and formed very strong and solid layers of a conglomerate
of silver sulphide, chloride, bromide and calcareous concretions (figs
12a–i).
|
|
|

Left: Fig. 11c, d Silver ingots no. 11a, b: above before
restoration (Photograph: A. Rettel); below after completion of
conservation and restoration measures (Photograph courtesy of Seabed
Explorations).
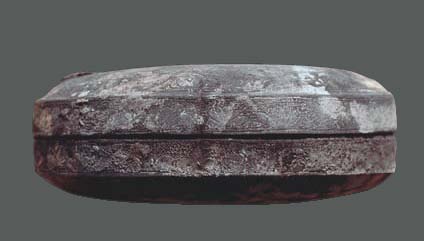
Right: Figs
12a–c Silver box no. 18 after removal of calcifications; side (above),top
(centre) and bottom (below) view (Photographs: A. Rettel).
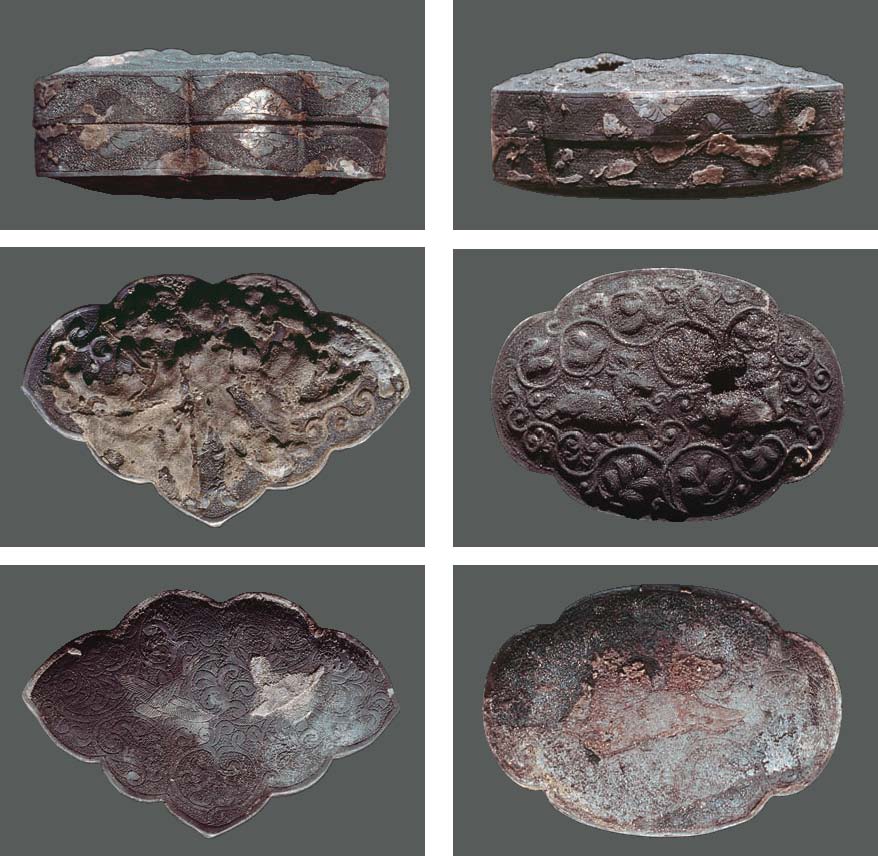
Figs 12d–f Silver box no. 15 after removal of
calcifications; side (above), top (centre) and bottom (below)
view (Photographs: A. Rettel).
Fig. 12g–i
Silver box no. 12 after removal of calcifications; side (above), top (centre)
and bottom (below) view (Photographs: A. Rettel).
As the silver corrosion
products corroded out of the material of the boxes, the silver structure on and
beneath the surface changed. Concerning the completely intact boxes, the
structure of the inside was conserved better. Only thin corrosion layers had to
be removed. The gilded parts could partly be recognized because of their
thinner corrosion layer compared to the pure silver surfaces because the gold
layers hindered the silver’s corrosion. The removal of deposits from the
original surfaces of the gilded silver objects was carried out either under the
microscope, mechanically with scalpel, wooden or acrylic glass pins, or –
for coarser deposits – micro grinding device (diamond). Some areas of the
corroded surface were treated by chemical or electrolytic reduction.
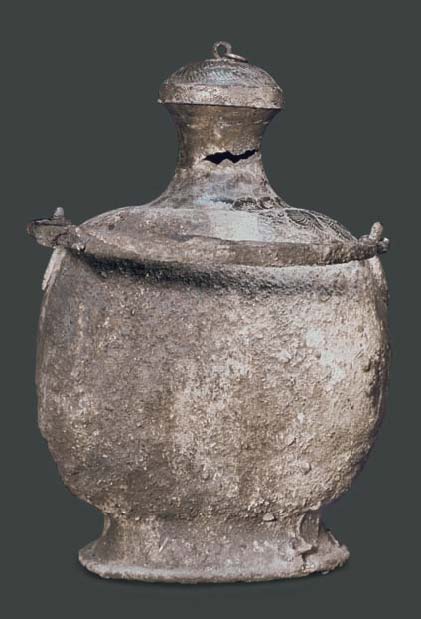
Fig. 13a Gilded
silver flask no. 21: Neck and corroded lid broken off; cleaning of lid, neck
and shoulder started (Photograph: A. Rettel).
A different corrosion could
be seen on the outside of the completely gilded flask no. 21. The neck of the
flask with its corroded lid was broken off, due to the intercrystalline
corrosion of the material. The neck does not sit accurately on the fracture
point due to its slight deformation at the time of breaking (figs 13a–c).
Beneath the layers of
calcareous deposits, there was the black silver corrosion I have already
mentioned, which showed various structures: chipping off, very strong, softer,
or firmly adherent. The corrosion had partly diffused through the gilding in
such a way that defects had formed underneath and, due to this circum stance,
in these areas, the plating was only held by the corrosion from the outside; in
places, it had separated from the corroded ground. These spots had to be
consolidated from behind so that they would not come off during the cleaning.
The corrosion had grown extensively where the gilding was missing or at spots
where the gilding was thinner, for example in the area of the depressions of
the embossed work (figs 13d).
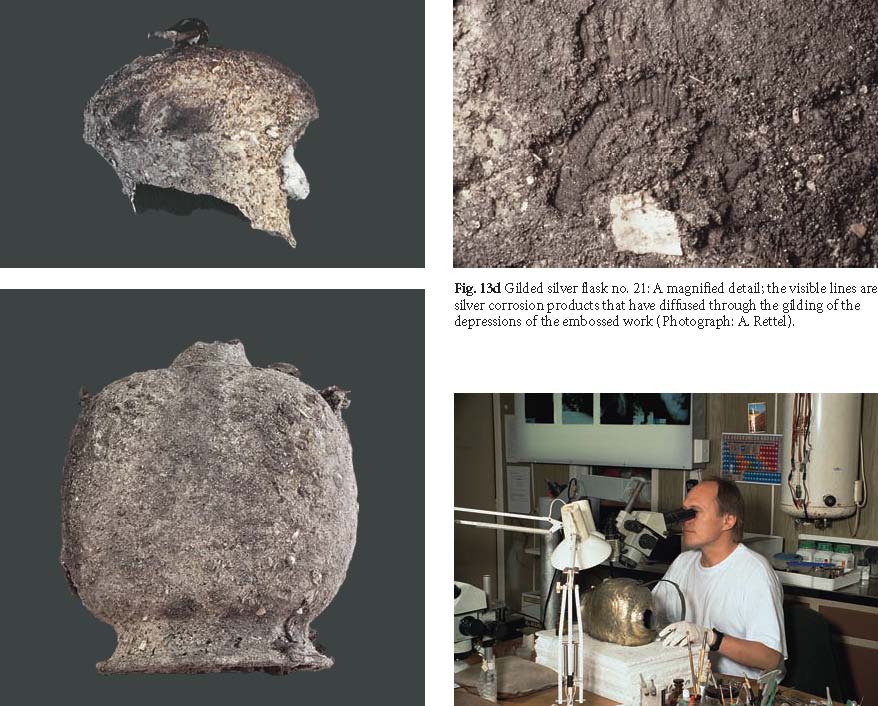
Fig. 13b, c Gilded
silver flask no. 21: Condition at time of discovery; broken off neck with lid (above)
and front view (below) (Photographs: A. Rettel).
Fig.
14 Restoration of
silver flask no. 21 under the microscope (Photograph courtesy Seabed
Explorations).
c. Gold
The gold objects were also
covered by hard layers of sediment. After removal of these layers, the gold
surface partly appeared. With high-quality gold, corrosion is only possible at
soldered points. In our case, there were reddish brown thin corrosion products,
which lay extremely firmly and hard on the surface. They could be removed with
the help of a mixture of a solution of EDTA and other chemicals to remove iron
oxide. The rest was removed under the microscope with soft wooden or acrylic
glass pins while meticulously taking care not to leave any traces of the
exposure on the soft gold surfaces. No copper corrosion could be seen at the
soldering points of the objects, which indicates the use of a high quality gold
solder.
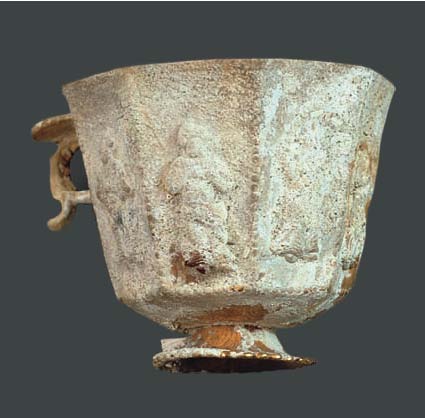
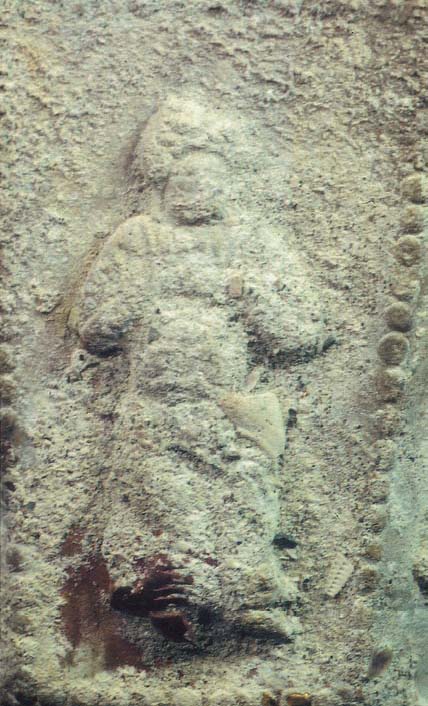
Fig. 15a Gold cup no. 1, condition at time
of discovery (Photograph: A. Rettel)
Fig. 15b Figure on gold cup no.1 before
removal of deposits (Photograph: A. Rettel).
Gold cup no. 1 (figs 15a–d)
No corrosion was found
behind the soldered figures that are slightly raised from the surface of the
cup, even under strong magnification. It is a high-quality gold solder which
made the producer turn to a special technique because of the high melting range
temperature and the multitude of pieces that had to be soldered in one single
operation: A mould was made in which the cup with the dressed figures was
clamped. The gold solder had already been put between the cup and the figures
so that merely soldering points were produced behind the figures instead of
soldering them extensively. The cup was heated until the parts were joined
together. At the same time, pressure was exerted on the cup, as proof you can
see the bulges of the silhouettes of the figures on the inner wall. The base
and handle of the cup are soldered, too.
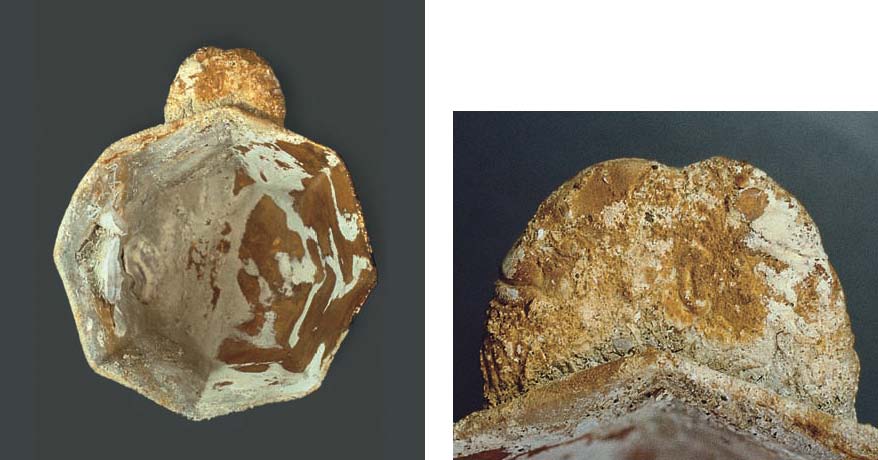
Fig. 15c Gold cup no. 1, condition at time
of discovery; top view (Photograph: A. Rettel).
Fig. 15d Soldered handle thumb plate, depiction
of two bearded faces; condition at time of discovery (Photograph: A. Rettel).
III. Conservation of Organic Materials
a. Wood
Various wooden objects as
well as parts of the vessel were salvaged (cf. nos
331–335). Water reduces the elasticity of the cellulose structure of wood
in the course of time. If such wood dries up, it shrinks and cracks –
different sorts of wood react slightly differently. The wooden objects,
therefore, were immersed in PEG (water-soluble) for a period of three years.
This wax penetrates the wet wood and, while drying, consolidates the cell
walls, which retain their shape.
Afterwards, the objects
were slowly dried under plastic foil. This process was controlled by measuring
the objects’ weight. When the weight remained the same, the drying
process was finished.
Lacquered wood
A wooden dish (no. 312),
lacquered red on the inside, black on the outside was immersed in PEG, too.
Flaking off lacquer was consolidated with wax.
b. Ivory
The drilled ivory knobs
(no. 321a–d) and the ivory rings (no. 320a,b)
were desalinated in distilled water, which was subsequently replaced with a
water-displacing solvent. Then the objects were immersed in the same kind of
solvent, in which B72 was dissolved in a steadily in creasing concentration.
The subsequent drying was controlled by measuring the objects’ weight.
Small missing parts were filled with microcrystalline wax. Final
treatment with a thin layer of acid-free museum wax.
c. Rope
Immersed
in PEG.
d. Resin (no. 322)
Soaked in
distilled water, stable condition.
e. Solids for ink production
The fragments were
consolidated while wet. A small amount of fragments and crumbs was slowly dried
without treatment for analysis.